
“Make it work, make it happen, and make it right. Once you create something, your name is on it"
Redesigned Lecture Desk
Introduction and identifying the problem
As a part of my Computer-Aided Design course (ME170), my team and I were tasked with the challenge to resolve an issue that many student might face in their day-to-day lives by designing a new electro-mechanical product that will meet the user's needs. Based on this challenge, our team decided to focus on unmet needs in areas pertaining to lecture halls. After interviewing some people regarding their experience at lecture halls, our team noticed a pattern regarding the lecture hall desks and then, decided to gain further insight about user experience with the lecture hall desks specifically.
Based on the notes gathered from our interviews, we concluded that the essential problem that users had with the lecture desk was the insufficient work space, the lack of sturdiness, and complications for left handed users. A few minor problems, such as objects falling off the desk, were also noted down and addressed during our ideation process.
Redesign Ideation and Concept Selection

Pugh Matrix
To evaluate the design concepts we brainstormed, we had to create a Pugh Matrix to help us decide which concept to select and develop. In general, a Pugh matrix works by comparing your design concepts to the current design solution based on various key factors. If the design concept is better than the current solution for the certain key factor, then a positive value is given. Similarly, if the design concept is worse, a negative value is assigned and if there a negligible change, then a value of 'S' is assigned. In our case, we decided to set the first concept as the baseline and compare the rest of the design concepts to the first one as our solutions introduced a new product rather than a redesign.
The ten key design specification that we decided to focus on were very important in helping us determine which of our initial ideas were the best. These specifications were focused on the production, function, and maintenance of our product. By using our own ranking system to assess each product’s strengths and weaknesses for each criteria, we were able to make better conclusions about which design to choose for our predict. In the end, as seen in the matrix to the right, Concept 3 showed the most promising results and we decide to implement this idea as our solution.
During the ideation phase, my team and I came up with multiple concepts to tackle the issues discussed earlier. Eventually, we combined some of our initial thoughts and ideas and narrowed down to 4 main concepts:
Concept 1
This design involves a hollowed out main desk with secondary desk housed inside main section. Secondary desk would extend out using a spring mechanism. Both of these desks will be made out of plastic and manufactured through injection molding.
Concept 2
Similar to concept 1, this design also involves a hollowed out interior of main section that contains a secondary desk. To the extend out the secondary desk, we planned on using a rail or slide system instead.
Concept 3
For this concept, the main lecture desk split into two sections starting out folded on top of each other attached by hinges. There is an option to fold out the top section of desk resulting in double the desk surface area, while maintaining sturdiness.
Concept 4
Along the same line of though as the previous concept except sections are attached by a pivot mechanism on the sides allowing for the top section to be pivoted out for extra desk surface area.


Final Concept
As a necessary step to ensure that there are no gaps in our final idea, we decided to further refine our concept and work out all the details before we moved forward to the CAD Modelling.
For our Final Concept, Our group realized that the current placement of the hinge could potentially harm somebody, as when the desk was in its folded state, the hinge was on the exterior. We relocated the hinge to ensure this would not happen. We also realized that a lot of lecture desks had problems with the mechanisms used in their rotation, and hence created our own take on such a mechanism. A sketch of this mechanism can be observed on the left.
CAD Model
We then created a 3D CAD Model of our redesigned lecture desk to start bringing the concept to life. The CAD Model was developed on the PTC Creo software.
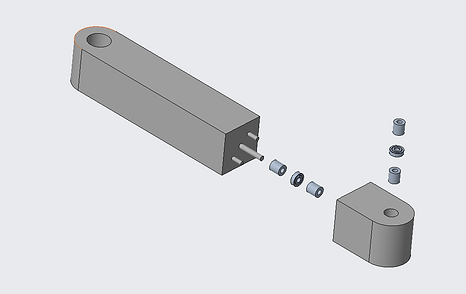
The Arm
The arm of the lecture desk is meant to allow the desk to rotate about two separate axes (about the arm). To implement this functionality, we divide the arm into two parts. One section of the arm will have three pins protruding out, allowing the other section of the arm to rotate about a particular axis while remaining connected to the first section. Through the screenshots below, one can also notice the second section of the arm has two unique features (above and below the hole). Those features are there to restrict the movement of the desk to about 180 degrees. Other than that, the top hole on the second section is where the table will attach and rotate about the arm. Lastly, we use ball bearings with 2 spacers on each side to help facilitate the rotation.


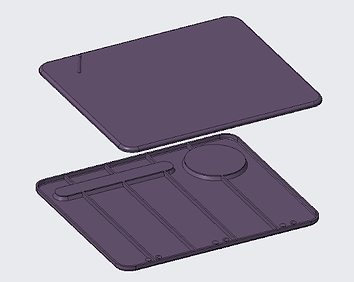
Table
For the table sub-assembly of the desk, we created two different tables, each of them hollow inside to reduce the amount of extra, unneeded material. However, in order to ensure the table does not break under the slightest of pressures, we added ribs between the table halves. The table tops also have indents that act as a cup holder and a pencil groove. Later, the two halves of a desk will be attached using adhesive bonding and then, both the desks will be attached using hinges.

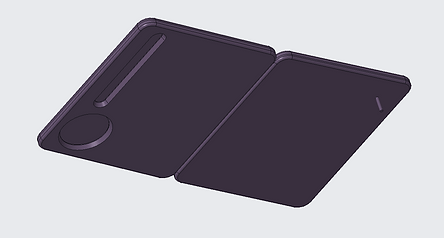

Final Assembly

Manufacturing and Conclusion


We decided to use injection molding because it produces parts in large volumes. We understand that one of the aspects that drives cost is the wall thickness; therefore, we made our wall thickness .1”. This made our product very affordable. Moreover, we used ABS because it is very tough, hard, and rigid. We want our product to be very durable and stable and ABS makes our product more resistant to damage. Furthermore, we decided to use die casting for the arm of the desk because it produces high strength parts and it can produce large and complex parts. We decided to use aluminum as our material because it was cost efficient and durable.
The total investment tooling required is $61,541 and the total cost of our product will be $35.91 each. We estimated the cost of our product to be $40, but by utilizing different materials and methods we were able to lower the cost. This retail price is very realistic. When researching other competitors, their desks and chairs are estimated to be $55-80 each. Because our product is larger and more functional, we will be able to compete with these other prices.
There is a medium risk in investing in our product. We created this product from a human centered design approach; therefore, people should want to buy our product, but there are no certainties. There is not a significant decrease in our product price compared to our competitors. However, our product does excel against our competitors in functionality and efficiency.
I would like to give credit and say thank you to my teammates (Nirvan, Lauren, and Jonathan) for their contributions and efforts towards this amazing project.